Thursday 4 April 2019

How to define oracle fusion gapless custom sequence at Ship Confirm Form Level

Fusion Generate Gapless Custom Sequence at
Ship Confirm Form Level

Requirement: As Oracle fusion, ship-confirm level shipment number sequence having a random seq. generate nature. We have required to assign a unique sequence number to shipment transaction.


Goto Home > Setup and Maintenance


Select Manufacturing and Supply Chain Material Management.


    1)      Select the Shipping tab from the left panel. 
    2)      Select ALL Task from LOV


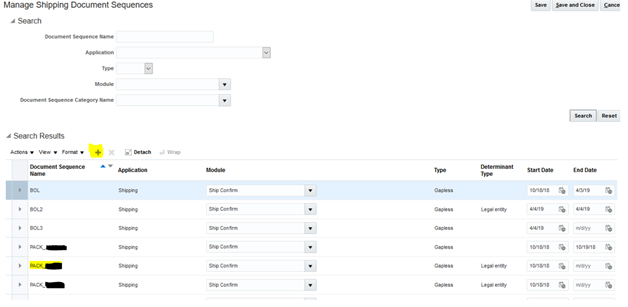
         Select  ‘Manage Shipping Document Sequences’.
·         Before creating shipping document sequence, create a sequence category.


·         Go to > Setup and Maintenance > Search > Manage Document Sequence Category.


Click on Search.


Create Document New Sequences.


Add details as per below screenshots.


Assign Newly created Document Sequence with Legal Entity.


Now we have to assign the following Document Sequence in shipping parameter window.

Shipping Document Job Set Rule.

·         Create Shipping document Job set as per below screenshot


      Define Ship Confirm Rule:-
·         Define Ship confirm rule and assign this to manage shipping parameter


Goto Home > Setup and Maintenance > Manufacturing and Supply Chain Material Management.
     
     1)      Select the Shipping tab from the left panel.
     2)      Select ALL Task from LOV
     3)      Select ‘Manage Shipping Parameter’


Now Create SO transaction and create Ship Confirm for the same.
Now Packing Slip Number (Which is in sequence in reference of sales order) automatically generated at Ship Confirm Level.


You can get that value from backend by using the following query.
Shipment Number = Delivery_id = 15016

SQL Query:
select delivery_id,packing_slip_number from wsh_new_deliveries
where packing_slip_number is not null and delivery_id=15016


Output:


Tuesday 2 April 2019

How to define custom sequence at DFF attributes level - Oracle Fusion

Fusion: Define Custom Sequence with DFF attributes

Goto Home > Select Setup and Maintenance Icon


Select Manufacturing and Supply Chain Material Management.


    1)      Select the shipping tab from the left panel.

    2)      Select ALL Task from LOV


Select ‘Manage Shipping Descriptive Flexfields’


Select the Search Button to find all available option.


Select Shipment for Edit.


Enter Details as per the screenshots


For Add or update Global Segment details


Default Value:
select trim(nvl(to_char(max(to_number(attribute1))+1,'00000000'),'10000001')) xx from wsh_new_deliveries where attribute1 is not null
and to_number(attribute1) >= 10000000
and REGEXP_LIKE(trim(attribute1), '^[[:digit:]]+$')


Now when you complete ship confirms process, it will automatically generate the sequence and insert into attribute1 value.

(Note: Sometimes due to browser cache issue sequence number will be duplicate)


Thursday 28 March 2019

Workflow PO Approval Error : Notify Preparer of No Approver Found

Workflow PO Approval Error: Notify Preparer of No Approver Found

Step 1: Create PO with following details.


Step 2: Add Shipment Information.


Step 3: save the transaction. Now PO Number generated.


Step 4: Click on the Approve button to Approve the PO.


Step 5: Login with Sysadmin user for Approve the PO.
                Navigation: Workflow Administrator Responsibility >  Administrator Workflow > Status Monitor
 

Step 6: Workflow seeded error
Error 1: Return PO to submitter
Error 2: Notify Preparer of No Approver Found


Step 7: Check PO Summary status for the same PO. Its Incomplete status because of Buyer is not listed in the Approval Group.


Step 8: Check the Buyer Position from HRMS responsibility.


Go to the Assignment tab by click on the Assignment button.


Step 9: Go to purchasing responsibility and check against this position Purchase Approval document type assigned or not.

Against this buyer Position no Document type for Purchase Order Approver available.


Step 10: Assign ‘Approve Standard Purchase Orders’ Document type against this position.


Step 11: Now Create new PO with same details, It will successfully complet with Approved status.